christmas : seven

CRACKERS

I have a strong dislike of store brought Christmas crackers unless you spend lots they are always disappointing. So after last Christmas I decided it was time to start a new tradition in our house of homemade Christmas crackers for the family Christmas lunch.
I like the idea of all three of us being involved. We collected toilet rolls all year, Mima's Dad was in charge of jokes, I made paper hats, brought cracker snaps and treats, we all helped make the paper to wrap them in.

First I made the paper hats. I used large sheets of white tissue, painted them with gold stripes (pictured). Then glued the two short ends together to create a loop. They were folded in half about six times, with the opening top and bottom. Cut this long folded piece in half (two halves pictured), then cut on an angle to create crowns (pictured).

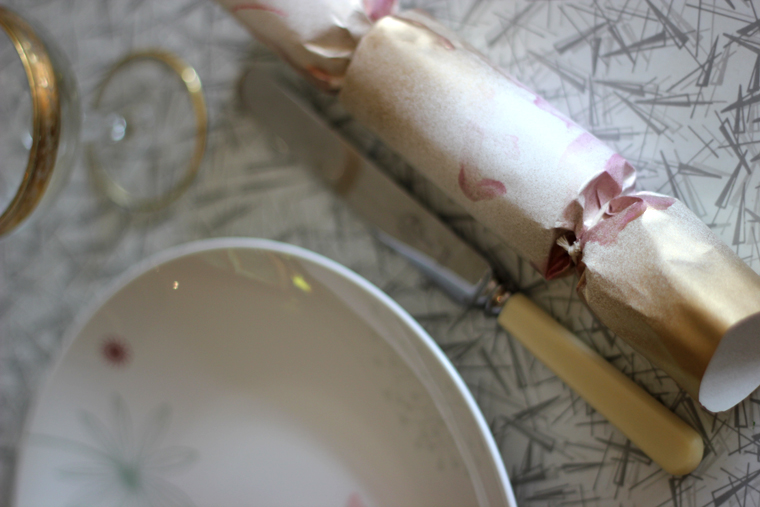
We decorated the paper to wrap the crackers with Honey Sticks (beeswax crayons) and homemade natural food colouring finger paint (I will do a separate post on this). Then I added some gold spray paint.

What I used:
toilet roll
paper to wrap (A4)
paper crown
cracker snap
treat
joke
string to tie ends
double sided tape

I found it useful to put a small piece of tape at one end of the cracker snap to keep it in place.

Merry Christmas! x

christmas : six

GLAZED HAM

This is a very important part of Christmas in our house, mostly because of Mima's Dad, he loves it on toast with butter and mustard. I haven't made one for a few years and with the addition of Mima I thought it was time to get back into the tradition. 
In the past I have made my glaze with mustard, beer and a lovely fig jam from and small producer Mustard Makers based in Puhoi north or Auckland where we live, but I don't think they make this product any more, so I had to re-think my glaze.
Beer is a lovely starting ingredient as it helps keep the ham vey moist. I know some people who have used other liquids including Coca Cola and rave about, but beer is perfect for us. Mima's Dad is passionate about boutique beer brewing and his choice for the ham was Tuatara London Porter
I had a little search around and decided this recipe on the Cuisine magazine website would be good to try. It involved grinding a selection of spices (star anise, cloves, fennel seeds, ground cinnamon and ground ginger) then adding a cup of dark brown sugar and enough beer to form a thick paste. 

The rest of the beer is poured over the ham, then you cover it in tin foil and cook for 40 minutes. The glaze paste is then added and you continue to cook for 30 minutes until golden brown. Super easy and I was right it was lovely.
Then it is important to put the ham in a ham bag which has been soaked in  a vinegar solution or lemonade, before placing it in the fridge. 


christmas : five

CHRISTMAS COOKIES
Giving homemade presents really makes you feel good about giving them.
This year (and last) Moo and I have made Christmas Cookies for friends, family and thank you gifts. 
Gingerbread and Shortbread are traditional Christmas cookies. Gingerbread are great as they're so nice to ice and last quite awhile. Shortbread are Moo's favourite. 

I used gIngerbread recipe from Donna Hay Kid's Magazine and for the shortbread recipe.the Edmond's Cookbook (a NZ classic).

christmas : four

We managed to find a little two foot Christmas tree which is perfect for our little house, on our way to the beach for our first swim for this summer. They told me they've been trimmed back to stay small but that's how they achieve the fullness too. I like how it looks fluffy.

So the next decorations we made these 3D Paper stars, I used pretty origami paper for the smaller ones and white craft card for large star at the top of the tree, which Moo helped handpaint long with the other decorations. We used the paper butterflies you may have seen on my previous post and the little stars from yesterday. Can you spot the peg doll fairy Louise gifted me for my first Christmas tree a couple of years back?


3D PAPER STARS 
For these stars you'll need: origami paper 15cm x 15cm, scissors, hot glue gun and fishing line or string.

Cut your paper into four smaller squares 7.5cm x 7.5cm. Right side together fold in half and, and half again. Wrong side together fold in half to to create triangle, and then half again for the opposing triangle.
Your square will look like this (above). Along your diagonal lines cut in 12mm. Fold in to create points of the star. Overlap the folded edges and glue together.

Create two identical stars, stick them together with the hot glue gun. Attach a loop of string so you can hang it on your tree.


christmas : three

I've only started doing my own Christmas tree recently since having Moo, actually this is only my second ever as we've had to move house twice in December in the last few years. Anyway I have decided that homemade decorations is the way to go. I like that I don't have to spend any money except for the purchase of the tree as I tones of paper and craft supplies already, and each year I get to make a whole new colour theme. This year is stars and butterflies in summery colours - white, yellow, pink, orange.

LITTLE PAPER STARS 


For these stars you will need: paper cut into 2cm strips - patterned paper or paints to decorate plain paper and yarn to thread stars together.

Make a knot with you paper strip, flatten and tuck the short end up. Fold the strip around continuing to create a pentagon shape.

Keep folding until get to the end of you paper strip, tuck the end under the triangle closest. 
Using your thumb nail make an indentation to shape the sides of the star like shown.
Decorate and string together using a needle and yarn.

christmas : two

PUD

Each year it is my job to make the Christmas pudding for our family get together. I'm not a fan of Pavlova so this suits me perfectly. I use Nigel Slater's gorgeous recipe from The Kitchen Diaries. It is so perfect I don't change anything so I won't post the recipe you can get his fabulous book for the measurements and details.

First I cut up all the fruit, there is a lot and a wide variety, its Christmas so why skimp! Then I soak the fruit in brandy over night.

I add the rest of the ingredients, one of these ingredients is suet, instead, I freeze the amount of butter I need then grate it. Then I spoon the mixture into my greased pudding basin. My basin was my grandmothers, so you really don't need a new one, I would just buy one second hand if there aren't any hidden away in a relatives attic. Cover the mixture with a greased and pleated (to allow for the mixture to rise) piece of grease proof paper and pop on the lid. Steam for three and a half hours.

Now we are ready to reheat on Christmas day, YUM!

christmas peg dolls

I haven't had time to feel very festive so far this year, but I just did a Christmas craft post on Babiekins and now the ideas are starting to follow. There will be a few more posts before Christmas.
My Babiekins post was a peg angel, I made a couple but just gave the instructions for the gold version pictured below.

Anyone who knows me, know I love making peg dolls! I few years ago I art directed a children's TV show which involved making a city populated by peg people. 
A few years ago also did a Christmas craft story for an interiors magazine and made festive peg dolls, Santa, Mrs Claus, Rudolph and an elf. These peg dolls come out each year to grace our shelf. I unpacked them today...

One Christmas's I made peg fairies for friends, with lovely pom pom skirts, they were also unpacked today.


paper butterflies

I made these DIY butterflies as cake toppers for Moo's birthday cake last week. They were so effective, and virtually free to make. So here's how I did them.


What you'll need:
black and white images of butterflies x 2 copies 
paints
scissors
craft wire
glue gun


Instructions:
1. Paint the butterflies in the colours you want, making the two layers the same leave to dry.
2. Cut out and pair matching butterflies
3. With your craft wire cut a piece 30cm long
4. Make a small loop to fit your butterfly wing size leaving a long tail about 15cm 
5. Twist and make a second loop, twist leftover length around tail
6. Glue your wire loops onto the backside of your top layer butterfly, in spots to attach the wings
7. Glue a large dot in the centre and place bottom layer butterfly attaching at the centre only, press with your finger.You can bend the top layer wings up to make it look like the butterfly wings flutter.


I think these will be going on our christmas tree!

around my house : four


We have this intriguing drawing. It was given to us by Mima's grandparents, they had received it from her Grandfather's parents, apparently it was a wedding gift to them. It is unsigned and we know nothing else about it.
I really love it and it is quite a mystery so if any of you have any ideas about it, please share them with me!


fourth birthday : three

THE FAIRY GARDEN PARTY : part two

THE CAKE
Chocolate cake with marshmallows, strawberries and no jam (as requested by the birthday girl)
I made a double batch of the Special Chocolate Cake recipe from Ladies, a Plate book, pink gradient butter cream icing with mini pink marshmallows in the centre. I made my own paper butterfly cake toppers (I'll show you how in the following weeks).


 THE FAIRY
We had Fairy Petals come to visit. She is  a woodland fairy that spends her days bouncing with the rabbits, flying with the bees and sitting in the treetops singing with the birds. Face painting, dancing, bubbles, stories, fairy dust and general excitement and amazement that a real fairy turned up to the party! She made the day so magical! 
Happy Birthday Moo we love you!

fourth birthday : two

THE FAIRY GARDEN PARTY : part one

DECORATIONS
Well Sunday was the big day. After a big week of prep we were ready for a garden party fit for a few fairies. We decorated the garden with streamers and tissue paper pompoms and fans, I had a few helpers which was a fantastic.


THE FOOD
I decided to stick to fairy colour theme of pink, white and green and food appropriate.  
Here are just a few of the fairy treats we nibbled on.
cakepops
rainbow pretzels 
pink fairy potion
cupcakes
homemade sausages 
fruit skewers


THE GIFTS
Wow Moo was showered with lovely gifts from friends and family. Her favourite though has to be the guitar (ukulele) from her daddy. The birthday girl had a few specific requests and a guitar was on the top of her list.

to be continued....

memory game

 I made this super cute memory game for Mima and thought I would share it with you...


1. Find some cute pictures, lay them out on an A4, print or photocopy two of everything. I also printed a polka dot pattern for the back.

2. Glue the two A4 sheets together, front pictures, back pattern. You could sandwich a piece of card in the middle to make them more sturdy.


3. Cut out the rounds.

4. Get them laminated.


5. Then cut them out, leaving a 5mm edge so the paper and card is sealed inside.


Then you can start playing!

fourth birthday : one

THE INVITATION - Fairy garden party 

Moo asked for a Fairy Party this year. Our back garden is quite pretty but tiny so I thought it would be perfect for a little fairy garden party with just a handful of friends. I wanted to create invitations that feel a little magical when opened and like a taster of more of the party to come, so I came up with a tissue paper fan!

What you'll need:
pink tissue paper - 12cm x 25cm
white card - cut into 3cm x 21cm strips (I printed mine first with party details)
double sided tape
scissors
stapler
hole puncher 
string
small brown envelopes
confetti gold stars


Instructions:
1. tissue paper fold this in 12mm consantina.
2. fold in half and staple at this point. cut ends round to create scolloped edge.
3. fold card strip in half, double side tape tissue fan inside card.
4. tape the centre of tissue together.  
5. hole punch end and cut into point
6. tie string through hole. 
7. put invitations in the envelopes and give a good sprinkling of confetti.

When you guests open the invitation it will fold out into a cute little fan.